
Post by HyperFX on Jul 3, 2007 1:42:20 GMT -6
Alright!
You just bought one of them fancy Hour Meters from F.O.G.! (T.J.)
(For detailed specifications, and more information about the Hour Meter, CLICK HERE)
Now, you need to install it.
What tools do you need?
Where do you put it? (Don't go there, Curt!)
How many nails hold it on the gas tank? ?
? 
It only takes one nail......if you want to do it the wrong way!
So, throw your hammer & nails in the toilet, and let's put this thing on a bike!
____________________________________________________________
 NOTE: This install was done on a 2005 Honda CRF450R.
____________________________________________________________
The Hour Meter
Simple, rugged design. Very solid. Your basic "git 'er done!" meter.
The tach refreshes every 1 second. Slightly slow, but effective.
The hour meter reads in 1/10th hour increments. 1/10th of an hour is 6 minutes. Duh.
Works like a champ!

_______________________________________________________
Find a good place to mount it
Be sure the red wire will reach the plug wire.
Try to find a place that is least susceptible to damage, and can be read easily.
How 'bout here, on the frame?!

______________________________________________________
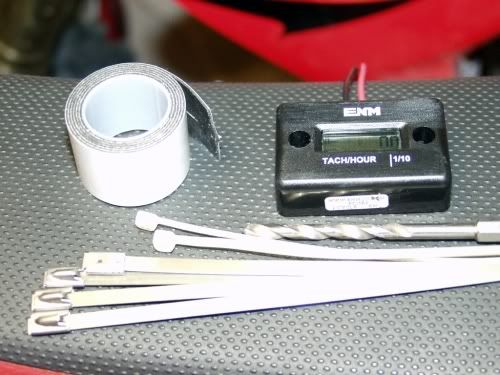
Things you might need
I couldn't use nails, because Bigfoot stole my hammer when Jeff and I were working on the crossover last Winter!
SO...
I decided to use four, 3/16" x 12" stainless steel zip ties, but a good quality nylon zip tie will work, too.
Also, to help protect the frame, and to act as a shock absorber, I put 3 layers of thin servo tape (double-sided foam tape) on the back of the meter.
You might want to use a few nylon zip ties to secure any loose wiring.
I slightly enlarged the mounting holes on the meter with a 3/16" drill bit to accommodate the steel zip ties. Didn't even need a drill, just twisted it by hand.
______________________________________________________
Remove the seat, and tank
(You don't really need a picture for that, do you?)
______________________________________________________
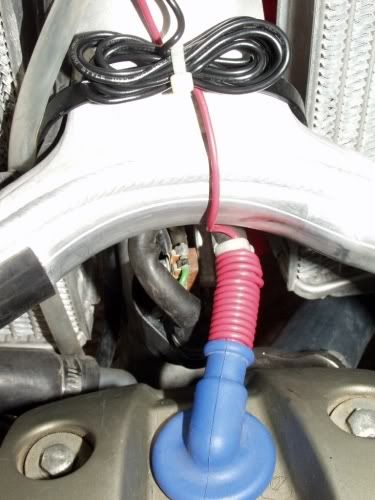
Route & secure the wires
After I removed the seat and tank, I used a small piece of servo tape to temporarily hold the meter in place while I found the best place to route the red & black wires.
The red wire needs to be wrapped around the plug wire for the meter to work properly.
I used a single nylon zip tie to secure the red wire to the plug wire. And, I used another zip tie to secure the excess black wire. (For this application the black wire is not needed.)
______________________________________________________
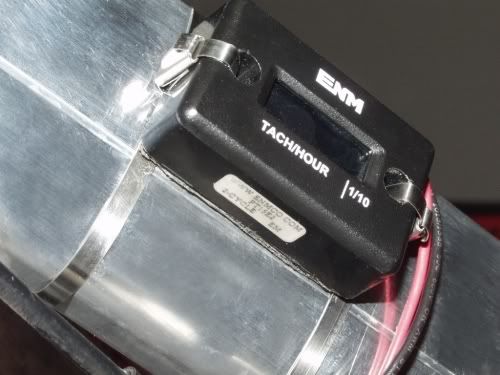
Zip ties
Put a zip tie in each of the mounting holes on the meter and almost pull them tight, leaving enough slack to thread another zip tie through it. Thread a zip tie through each of the first zip ties and secure them around the frame. Do not tighten! Remove the servo tape backing, and lightly place the meter where wanted. Now, tighten the mount hole ties first, then tighten the frame mount ties. Press the meter against the frame and re-tighten all the zip ties until secure.
Be sure to double check all the fasteners, and wire routing before re-installing the tank and seat.
______________________________________________________
Looking Good!
It won't make you faster, but it will remind you to change the oil on time!

______________________________________________________
OK, you're done!
Just start your bike, and the meter senses the spark through the plug wire. Yes, it's that easy, Curt!
______________________________________________________
Next time, we'll learn how Curt got the hammer and nails out of his clogged toilet.
You just bought one of them fancy Hour Meters from F.O.G.! (T.J.)
(For detailed specifications, and more information about the Hour Meter, CLICK HERE)
Now, you need to install it.
What tools do you need?
Where do you put it? (Don't go there, Curt!)
How many nails hold it on the gas tank?
 ?
? 
It only takes one nail......if you want to do it the wrong way!
So, throw your hammer & nails in the toilet, and let's put this thing on a bike!
____________________________________________________________
NOTE: This install was done on a 2005 Honda CRF450R. ____________________________________________________________
The Hour Meter
Simple, rugged design. Very solid. Your basic "git 'er done!" meter.
The tach refreshes every 1 second. Slightly slow, but effective.
The hour meter reads in 1/10th hour increments. 1/10th of an hour is 6 minutes. Duh.
Works like a champ!
_______________________________________________________
Find a good place to mount it
Be sure the red wire will reach the plug wire.
Try to find a place that is least susceptible to damage, and can be read easily.
How 'bout here, on the frame?!
______________________________________________________
Things you might need
I couldn't use nails, because Bigfoot stole my hammer when Jeff and I were working on the crossover last Winter!
SO...
I decided to use four, 3/16" x 12" stainless steel zip ties, but a good quality nylon zip tie will work, too.
Also, to help protect the frame, and to act as a shock absorber, I put 3 layers of thin servo tape (double-sided foam tape) on the back of the meter.
You might want to use a few nylon zip ties to secure any loose wiring.
I slightly enlarged the mounting holes on the meter with a 3/16" drill bit to accommodate the steel zip ties. Didn't even need a drill, just twisted it by hand.
______________________________________________________
Remove the seat, and tank
(You don't really need a picture for that, do you?)

______________________________________________________
Route & secure the wires
After I removed the seat and tank, I used a small piece of servo tape to temporarily hold the meter in place while I found the best place to route the red & black wires.
The red wire needs to be wrapped around the plug wire for the meter to work properly.
I used a single nylon zip tie to secure the red wire to the plug wire. And, I used another zip tie to secure the excess black wire. (For this application the black wire is not needed.)
______________________________________________________
Zip ties
Put a zip tie in each of the mounting holes on the meter and almost pull them tight, leaving enough slack to thread another zip tie through it. Thread a zip tie through each of the first zip ties and secure them around the frame. Do not tighten! Remove the servo tape backing, and lightly place the meter where wanted. Now, tighten the mount hole ties first, then tighten the frame mount ties. Press the meter against the frame and re-tighten all the zip ties until secure.
Be sure to double check all the fasteners, and wire routing before re-installing the tank and seat.
______________________________________________________
Looking Good!
It won't make you faster, but it will remind you to change the oil on time!
______________________________________________________
OK, you're done!
Just start your bike, and the meter senses the spark through the plug wire. Yes, it's that easy, Curt!
______________________________________________________
Next time, we'll learn how Curt got the hammer and nails out of his clogged toilet.